On any of the list screens, when you click on an item in the list, you will navigate to the Details Screen. On this screen you will be able to view all the information entered for that Tenant, Contractor, Support Team member, or other applicable section.
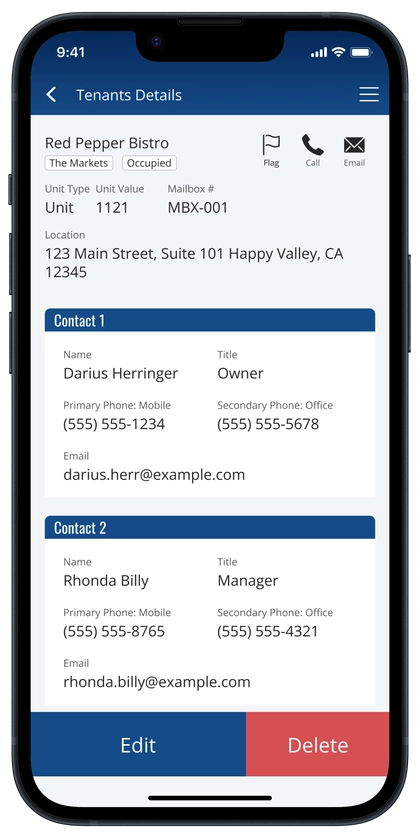
Here are common items on details screens:
Flags #
Flags give you a way to highlight tenants, contractors, or other applicable items. Here are some use cases for flags:
- Mark tenants or contractors that cause repeated violations
- Remind yourself you left a note about a contact
- Remind yourself to follow up with a contractor
The flag icon displays a black outline if unflagged, and as a red solid color when flagged. While in the details view of an item, if unflagged, click on the icon to enable the flag, or if flagged, click on the icon to disable the flag.
Flag Reminder Notifications #
Once clicked, a dropdown will appear to send reminders. Reminders are push notifications that will show on your device to notify you that you flagged that tenant.
Switch the toggle to ‘On’ to enable ‘Send Reminders’. Once enabled, you can choose how often the push notification reminders will be sent to your device.
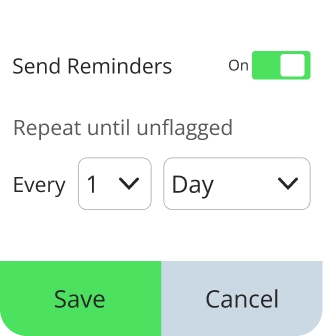
‘Repeat until unflagged’ option #
After ‘Every’, the first input is the frequency, and the second input is the period.
For the period choose from minutes, hours, days, weeks, or months, then choose a number for the frequency of that period.
For example, if you choose ‘1’ for the frequency and ‘Day’ for the period, the notification will be sent every day. Or if you choose ‘3’ for the frequency and ‘Hours’ for the period, the notification will be sent every 3 hours.
Here is a table of results based on example selections:
| Frequency | Period | How often notification reminders will be sent to your device |
| 1 | Minute | Every minute |
| 5 | Minutes | Every 5 minutes |
| 10 | Minutes | Every 10 minutes |
| 2 | Hours | Every 2 hours |
| 7 | Hours | Every 7 hours |
| 12 | Hours | Every 12 hours |
| 3 | Days | Every 3 days |
| 9 | Days | Every 9 days |
| 18 | Days | Every 18 days |
| 4 | Weeks | Every 4 weeks |
| 11 | Weeks | Every 11 weeks |
| 20 | Weeks | Every 20 weeks |
| 1 | Month | Every month |
| 6 | Months | Every 6 months |
| 15 | Months | Every 15 months |
Click ‘Save’ to confirm your selection or click ‘Cancel’ to cancel your changes. Once confirmed or cancelled, the flag icon will turn solid red to indicate the flag is enabled.
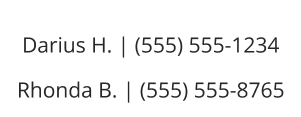
Call Contacts #
The phone icon labeled ‘Call’ allows you to call the primary number of any contact.
In the list view, the phone call icon calls the primary number of the first contact attached to that item.
In the full details view, when you click the ‘Call’ icon, a dropdown will display with a list of the available contacts with their name and their primary phone number. Click any of the contacts in the list to automatically dial their number on your phone so you can quickly make the call.
Email Contacts #
The envelope icon labeled ‘Email’ allows you to send an email to the primary email address for the tenant. Click on the ‘Email’ icon and you will be redirected to your email inbox on your device. The email address will be automatically copied and pasted in the ‘To’ field in your inbox so you can quickly compose a message and send to the tenant.
Attach Contacts #
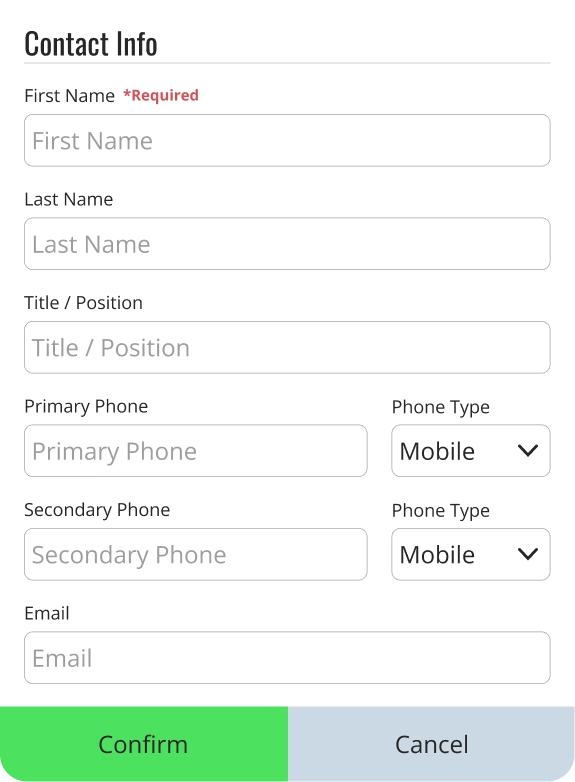
Attach multiple contact people to tenants or contractors. Each contact card contains the following information:
Name: First and last name of the contact person
Title: The title or position of the contact person
Primary Phone: The primary phone number and the type of number such as Mobile, Work, Office, Work Fax or Custom. This number is used for quick calls when you click on the ‘Call’ phone icon.
Secondary Phone: The secondary phone number and the type of number
Email: The primary email address of the contact person
To add, edit or delete contacts, go to the full details page of that item.
Add Contacts #
To add a Contact, click the ‘Add Contact’ button and the Contact Info form will pop up on your screen. Fill in the available fields and when you are finished, click ‘Confirm’ to save the contact information. Click ‘Cancel’ to go back to the previous screen without saving any information.
Edit Contacts #
To edit a Contact, click ‘Edit’ next to the name of the contact you want to update. The Contact Info form will pop up on your screen where you can make any changes to the contact information.
When you are finished making changes, click ‘Confirm’ to save your changes, or click ‘Cancel’ to go back to the previous screen without saving your changes.
Delete Contacts #
To delete a Contact, click ‘Delete’ next to the name of the contact you want to remove. When you are prompted to confirm deleting the contact, click ‘Yes, Delete’ to confirm deletion. Otherwise, click ‘No, go back’ if you do not want to remove the contact.
**Note: Deleting data is permanent and cannot be undone, so make sure this is what you want to do
Private Notes #
Save private notes as general information or reminders. Each note will be displayed in a list with the date the note was taken.
**Note: Notes you save in your admin account are private and can only be seen by you and your invited app managers
To add, edit or delete notes, go to the full details page of that item.
Add Notes #
To add notes, click the ‘Add Notes’ button and a popup will appear. Enter your notes in the input field then click ‘Confirm’ to save your notes. Click ‘Cancel’ to ignore your changes and to close the popup window.
Edit Notes #
To edit a note, click ‘Edit’ next to the note you want to change. When the Edit Notes popup appears, update your note, then click ‘Confirm’ to save your changes. Click ‘Cancel’ to ignore your changes and to close the popup window.
Delete Notes #
To delete a note, click ‘Delete; next to the note you want to remove. When you are prompted to confirm deleting the note, click ‘Yes, Delete’ to confirm deletion. Otherwise, click ‘No, go back’ if you do not want to remove the note.
Upload Files (Photos / Documents) #
Upload photos, documents, or other files to attach to a tenant. Each uploaded file will be displayed in a list, and you can toggle between list view (lines) to see a single column list of all files, or grid view (squares) to see a grid of all files.
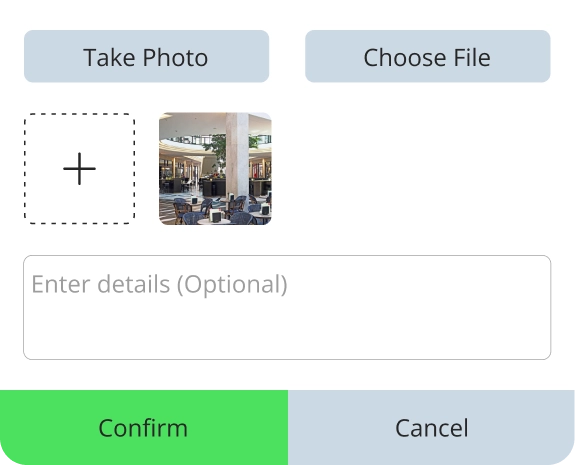
To add a new file, click on the ‘Add Files’ button, then a popup with be displayed. Click ‘Take Photo’ to use your mobile device to take a photo, or ‘Choose File’ to browse the available files on your device.
You can alternatively click on the plus icon with the dotted square outline to choose files on your device.
To delete a file (photo, image, or documents), click on the trash can icon in the upper right corner of the file thumbnail. When you are prompted to confirm deleting the file, click ‘Yes, Delete’ to confirm deletion. Otherwise, click ‘No, go back’ if you do not want to remove the file.
**Note: The following file types are currently supported: .jpg, .png, .gif, .pdf
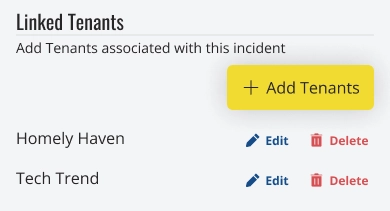
Linked Tenants #
Add Linked Tenants #
Choose from your current list of Tenants to ‘link’ or associate them with the current item.
To link a new tenant, click on the ‘Add Tenants’ button. Then on the next screen, click the ‘Select a tenant’ dropdown to select any tenant listed in your account.
Once you have selected a tenant, click ‘Confirm’ to add the tenant, or click ‘Cancel’ to go back to the details screen.
After you confirm your selection, you will see the new tenant block added in the list. You can click anywhere on the block to view the full details of that tenant. Click on the phone icon to quickly call the primary phone number for that tenant.
Edit Linked Tenants #
To edit / change a linked tenant, click on the ‘Edit’ button at the bottom of the details screen. Scroll down to the Linked Tenants section. Find the tenant you want to edit / change then click ‘Edit’ next to that tenant.
Click the ‘Select a tenant’ dropdown to choose a new tenant. When you click the ‘Confirm’ button, the new tenant you selected will replace the old one.
Click ‘Cancel’ to cancel any edits and go back to the previous screen.
Delete Linked Tenants #
To delete a linked tenant, click on the ‘Edit’ button at the bottom of the details screen. Scroll down to the Linked Tenants section. Find the tenant you want to remove then click ‘Delete’ next to that tenant.
When you are prompted to confirm, click ‘Yes, Delete’ to confirm deletion. Otherwise, click ‘No, go back’ if you do not want to remove the linked tenant.
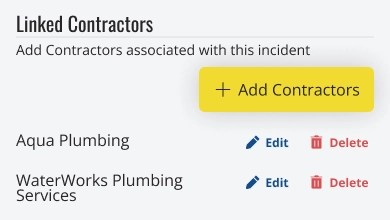
Linked Contractors #
Add Linked Contractors #
Choose from your current list of Contractors to ‘link’ or associate them with the current item.
To link a new contractor, click on the ‘Add Contractors’ button. Then on the next screen, click the ‘Select a contractor’ dropdown to select any contractor listed in your account.
Once you have selected a contractor, click ‘Confirm’ to add the contractor, or click ‘Cancel’ to go back to the details screen.
After you confirm your selection, you will see the new tenant block added in the list. You can click anywhere on the block to view the full details of that contractor. Click on the phone icon to quickly call the primary phone number for that contractor.
Edit Linked Contractors #
To edit / change a linked contractor, click on the ‘Edit’ button at the bottom of the details screen. Scroll down to the Linked Contractors section. Find the contractor you want to edit / change then click ‘Edit’ next to that contractor.
Click the ‘Select a contractor’ dropdown to choose a new contractor. When you click the ‘Confirm’ button, the new contractor you selected will replace the old one.
Click ‘Cancel’ to cancel any edits and go back to the previous screen.
Delete Linked Contractors #
To delete a linked contractor, click on the ‘Edit’ button at the bottom of the details screen. Scroll down to the Linked Contractors section. Find the contractor you want to remove then click ‘Delete’ next to that contractor.
When you are prompted to confirm, click ‘Yes, Delete’ to confirm deletion. Otherwise, click ‘No, go back’ if you do not want to remove the linked contractor.
Share via Email #
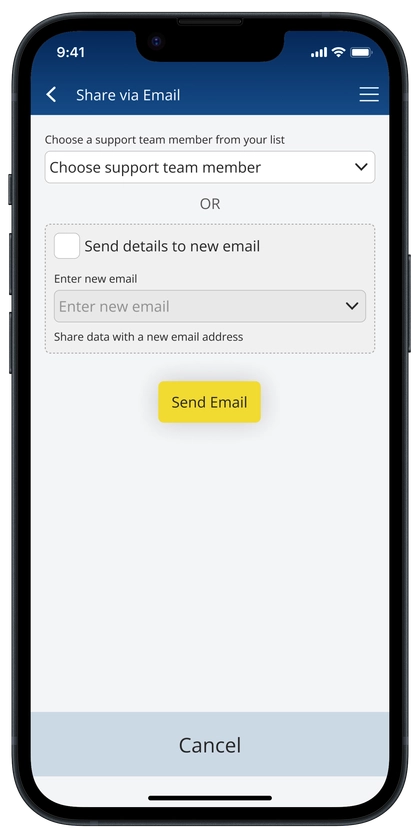
Share the full details of an item with an owner, someone on your team, or anyone outside the app via email.
To share, click on the ‘Share via Email’ icon. On the next screen, if you want to send an email to a team member already listed in your account, click on the first drop-down, then select the team member. By default, the app will use the primary email address listed for the selected team member.
If you want to send an email to someone that is not listed in your account, click on the checkbox next to ‘Send details to new email’, then enter the email address.
When you’ve finished with your selection, click on the ‘Send Email’ button to confirm. The app will send an email to the person you’ve selected with the full details of the item, and will include any files (documents, photos etc.) as an email attachment.
If you do not want to send the email, click ‘Cancel’ to go back to the previous screen.


